How to: Azure App Service with App Configuration via managed identity
By Mirek on (tags: App Configuration, App Service, ASP.NET, asp.net Core, azure, Managed Identity, categories: None)In this post I’ll show you how to set up Azure App Configuration and use it with your ASP.NET Core application hosted as Azure App Service. Additionally we will use the most secure authentication protocol which is Azure Managed Identity. Keep reading!
Configuration is something that every application uses and requires. Configuration files are everywhere and very often in many variants for many different deployment environments and scenarios. When we develop complex systems, based on microservices, with many components spread around it might become a nightmare to handle all its configuration files and settings.
The Azure App Configuration and Azure Kay Vault are the cure for this problem. They are designed to be central place for you application configuration and secrets.
In this post we will focus only on App Configuration though. This is the basic and recommended approach to store configuration for your applications.
Without any further ado let’s dive in to example.
Let’s say we have a web ASP.NET Core application already deployed as App Service called AppConfigClientApp and we want to take advantage of the App Configuration. We need to perform following steps:
- Create App Configuration instance
- Enable system assigned identity on our App Service
- Setup managed identity between our App Service and App Configuration
- Fill in the App Configuration with our configuration values
- Adjust the application code to use Azure App Configuration
Let’s go through these steps one by one.
1. Create App Configuration instance
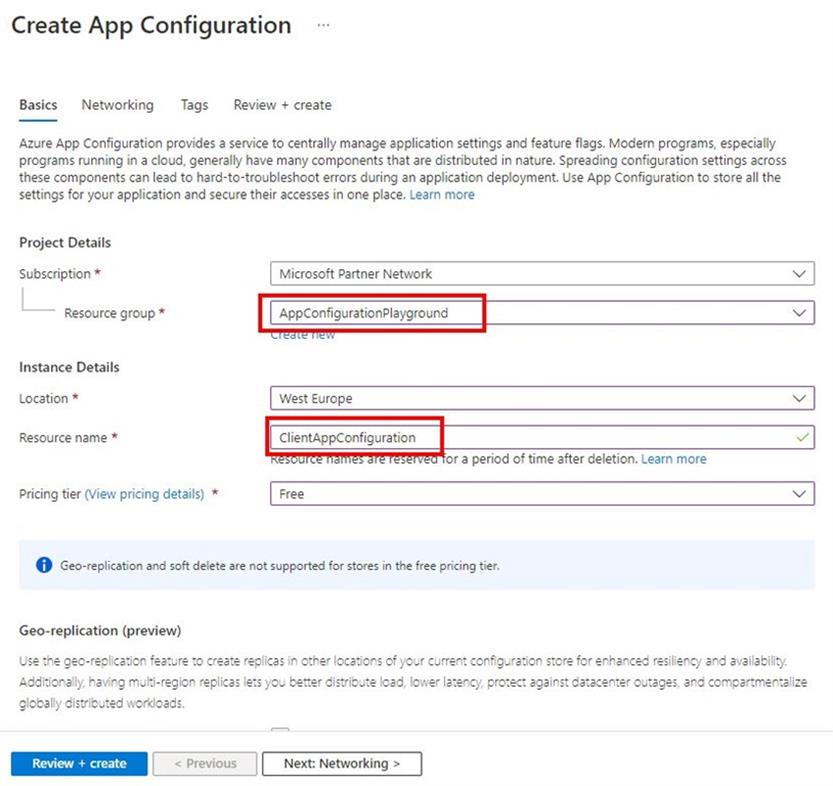
This step is quite straight forward. You can follow the Microsoft guide one that, but basically you need to setup the target resource group, unique app configuration name, region and the pricing tier. For testing purposes you can use Free tier as shown below
While our new App Configuration is spinning up we can go to next point.
2. Enable system assigned identity on the App Service
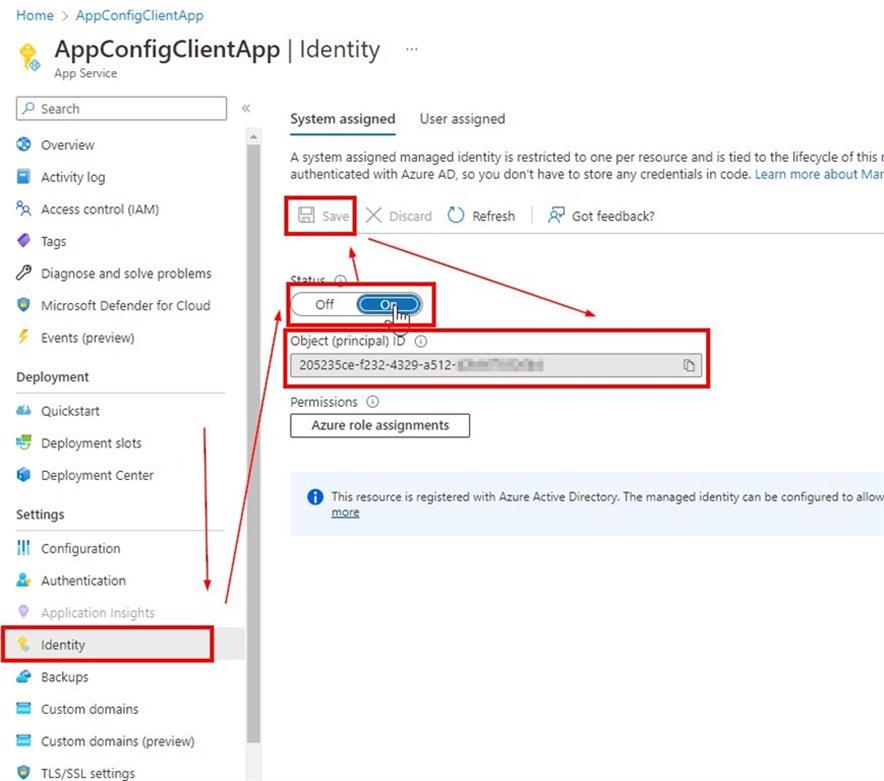
To enable system assigned identity, which is required for managed identity authentication you can just follow below screenshot
Go to your App Service, then select Identity on the left side toolbar, then System assigned, switch Status to On, Save and grab the Object ID which uniquelly identifies you app service identity. (In case you ask, presented example apps and configuration together with entire resource group does not already exist while you’re reading this post ![]() )
)
3. Setup managed identity between our App Service and App Configuration
In this case the documentation is clear and you can follow MS doc example here.
Basically the managed identities is the recommended and most secure way to communicate between your applications and resources in Azure. It eliminates any access tokens and passwords in your application code or configuration.
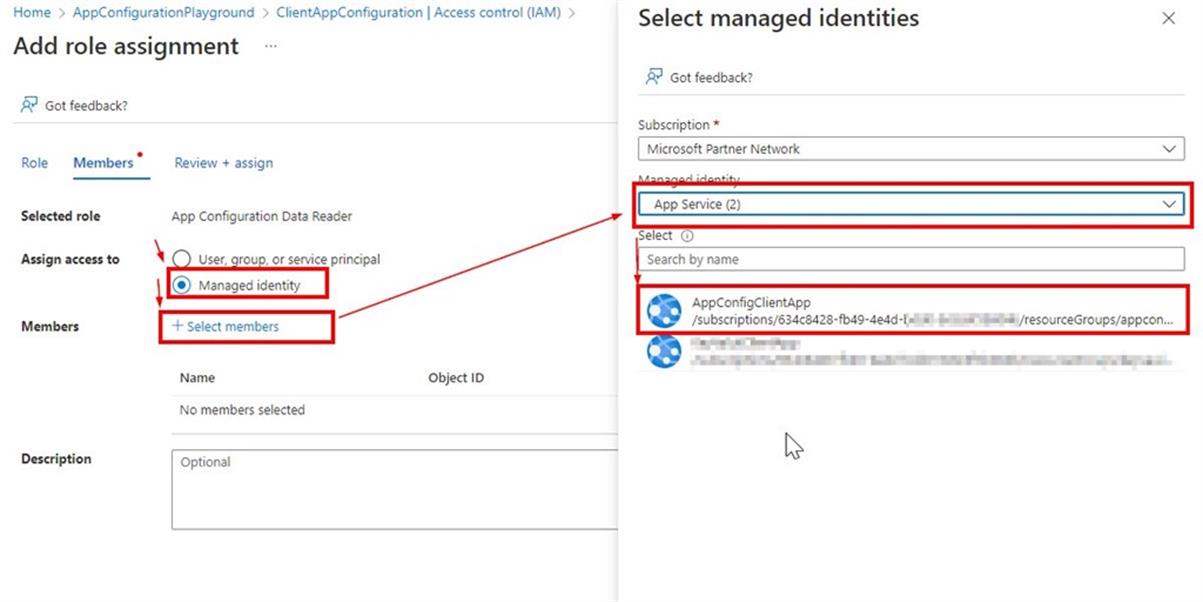
In App Configuration view select Access control then Add role assignment, then select App Configuration Data Reader role and select memebers from the App Services list ass follows
Finally click Select and Review and assign
Now we are ready to feed our App Configuration with some settings.
4. Fill in the App Configuration with configuration values
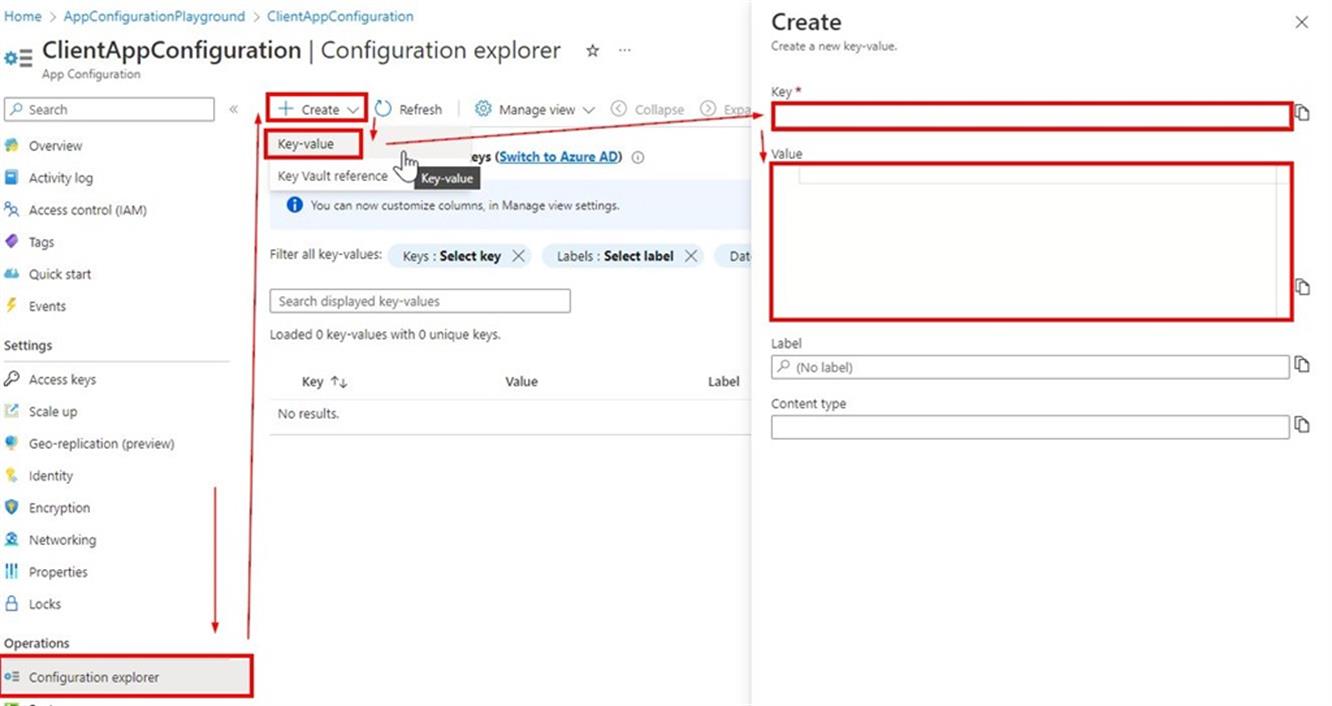
To add configuration values we use Configuration explorer in the portal as on the following screen
Using this method add following settings pairs
Key: “Settings:MyString” Value : “This is my string setting from App Configuration”
Key: “Settings:MyInt” Value : “2022”
5. Adjust the application code to use Azure App Configuration
Now we need to tell our web application how to query the configuration from App Configuration service.
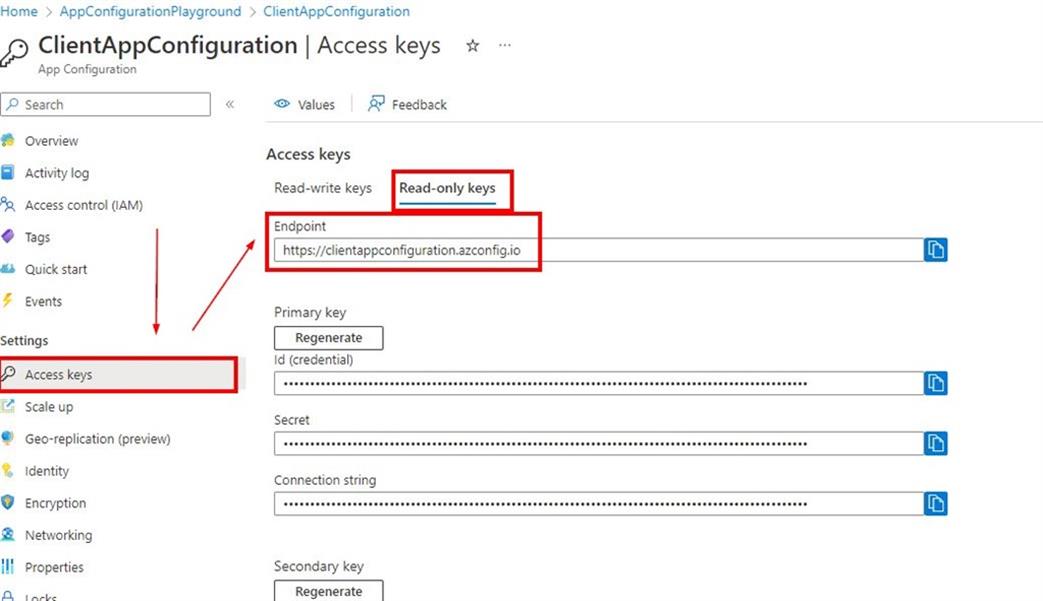
For that we need to grab App Configuration endpoint
which we will use in the code.
As you can see there are also different ways of connecting to App Configuration. You can also use the connection string, but then you have to make sure you keep this connection string securelly (in Azure Key Vault for instance), as it contains the connection secret. This is generally not recommended solution in most cases.
First lets create simple class representing the configuration settings
public class Settings
{
    public string? MyString { get; set; }
    public int MyInt { get; set; }
}
And consume it in one of the web application endpoint
using AppConfigClientApp;
using Microsoft.Extensions.Options;

var builder = WebApplication.CreateBuilder(args);
var app = builder.Build();

app.MapGet("/", () => "Hello from AppService!");

app.MapGet("/settings", (IOptions options) =>
{
    return $"This is my setting: {options.Value.MyString}";
});

app.Run();
As you can see the web app is the minimal api web application. Now according to the documentation we need to configure Azure App Configuration
var builder = WebApplication.CreateBuilder(args);

builder.Configuration.AddAzureAppConfiguration(o =>
{
    o.Connect(new Uri("https://clientappconfiguration.azconfig.io"),
                new ManagedIdentityCredential());
});

builder.Services.Configure(builder.Configuration.GetSection("Settings"));

var app = builder.Build();
//rest of code
One comment is required here. Since we are using managed identity we only need to provide the App Configuration endpoint to the application. We can put it in the configuration file or just straight in the code. There are no confidential or secret data included here as the authentication and authorization happens in the Azure. This has some downsides though, which are well described here. Basically this approach will not work until the web app is deployed to the Azure cloud. When we try to run it locally we will get an error that application cannot authenticate to the App Configuration service. We will workaround it for local development later, but now let’s deploy the app and see if we get the settings pulled from the App Configuration.
After the deployment is succesfull got to following url:
and you should get:
This is my setting: This is my string setting from App Configuration
Fine. we are having App Configuration configured for our web app.
Now how can we overload App Configuration while developing our application locally? Solution is quite simple. We need to condition the use of App Configuration on the environment we are in and allow it on production only. Additionally we can define the appsettings.json file with same settings in it and get advantage of ASP.NET Core configuration inheritance to override it in development.
After these modification we have following code in Program.cs
using AppConfigClientApp;
using Azure.Identity;
using Microsoft.Extensions.Options;

var builder = WebApplication.CreateBuilder(args);

if (builder.Environment.IsProduction())
{
    builder.Configuration.AddAzureAppConfiguration(o =>
    {
        o.Connect(new Uri("https://clientappconfiguration.azconfig.io"),
                  new ManagedIdentityCredential());
    });
}

builder.Services.Configure(builder.Configuration.GetSection("Settings"));

var app = builder.Build();
app.MapGet("/", () => "Hello from AppService!");
app.MapGet("/settings", (IOptions options) =>
{
    return $"This is my setting: {options.Value.MyString}";
});

app.Run();
and the following appsettings.Development.json file content
{
  "Settings": {
    "MyString": "My local dev string value",
    "MyInt" :  0
  }
}
Having that in place run your project and navigate to the /settings endpoint. You should get you local dev settings
This is my setting: My local dev string value
That’s it. I encourage you to read more in this topic especially about caching and refreshing policies for accessing App Configuration settings.

 back
back
