One collection – many views
By Mirek on (tags: CollectionView, WPF, categories: code)Let’s imagine we have a huge collection of some objects (may be our data objects) and we need to filter this collection and display only a part of its elements in different places in our WPF application. Instead of creating many different instances of sub collection we can use the benefits of collection views.
CollectionView is a wrapper around a collection that allows filtering, sorting and grouping elements without modifying the source collection. Additionally collection view provide a functionality of navigating the current item of a collection.
Ok, lets see this in practice.
We have a collection People of objects of following class (just for the purpose of this example)
1: public class Person
2: {
3: public string Name { get; set; }
4:
5: public bool IsAuthor { get; set; }
6:
7: public bool IsCustomer { get; set; }
8:
9: public bool IsExpert { get; set; }
10: }
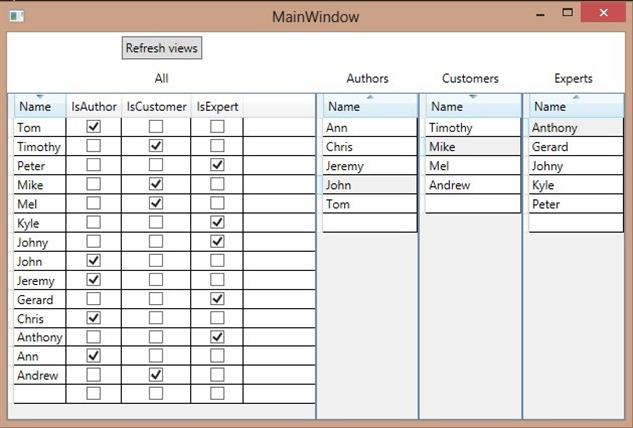
filled with some dummy data. Now we want to display the original collection in one data grid, all authors, customers and experts in other separate data grids. So we put four DataGrids in main window
1:
2: <DataGrid x:Name="lvAll"
3: Grid.Row="2"
4: Grid.Column="0" />
5:
6: <DataGrid x:Name="lvAuthors"
7: Grid.Row="2"
8: Grid.Column="1"
9: AutoGenerateColumns="False">
10: <DataGrid.Columns>
11: <DataGridTextColumn Width="*"
12: Binding="{Binding Name}"
13: Header="Name"
14: SortMemberPath="{Binding Name}" />
15: </DataGrid.Columns>
16: </DataGrid>
17: <DataGrid x:Name="lvCustomers"
18: Grid.Row="2"
19: Grid.Column="2"
20: AutoGenerateColumns="False">
21: <DataGrid.Columns>
22: <DataGridTextColumn Width="*"
23: Binding="{Binding Name}"
24: Header="Name"
25: SortMemberPath="{Binding Name}" />
26: </DataGrid.Columns>
27: </DataGrid>
28: <DataGrid x:Name="lvExperts"
29: Grid.Row="2"
30: Grid.Column="3"
31: AutoGenerateColumns="False">
32: <DataGrid.Columns>
33: <DataGridTextColumn Width="*"
34: Binding="{Binding Name}"
35: Header="Name"
36: SortMemberPath="{Binding Name}" />
37: </DataGrid.Columns>
38: </DataGrid>
1: AuthorsView = new ListCollectionView(People);
2: AuthorsView.Filter = (p) => { return (p as Person).IsAuthor; };
3:
4: CustomersView = new ListCollectionView(People);
5: CustomersView.Filter = (p) => { return (p as Person).IsCustomer; };
6:
7: ExpertsView = new ListCollectionView(People);
8: ExpertsView.Filter = (p) => { return (p as Person).IsExpert; };
9:
10: lvAll.ItemsSource = CollectionViewSource.GetDefaultView(People);
11: lvAuthors.ItemsSource = AuthorsView;
12: lvCustomers.ItemsSource = CustomersView;
13: lvExperts.ItemsSource = ExpertsView;
1: private void Button_Click(object sender, RoutedEventArgs e)
2: {
3: CustomersView.Refresh();
4: ExpertsView.Refresh();
5: AuthorsView.Refresh();
6: }

 back
back
