Using Azure Active Directory application roles
By Dawid on (tags: active directory, asp.net 5, azure, role, categories: azure, code, security)In this post I’ll try to explain how we can build an MVC application that uses Azure Active Directory Application Roles for authorization. This kind of authorization is implemented using role based access control – RBAC. When using this kind of authorization we can grant permissions to roles, not to individual users or groups. The administrator can then assign roles to different users and groups. Thanks to that he can control who has access to what content and functionality.
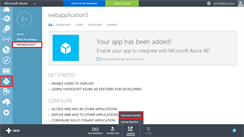
Custom application roles can be defined in Azure Management Portal in our application manifest file. All you need to do is to download your application manifest file by clicking Download Manifest:
In this file we can specify roles specific to our application. These application roles can be assigned to a user or group. Then when a user signs in to the application, the user token will contain a roles claim with any of the application roles the user was assigned to - either directly or indirectly through group assignment. This then allows your application to make authorization decisions purely based on the roles claim.
Each role have following fields:
- id – unique quid which will identify your role
- displayName – this will be displayed in the users and groups assignment experience as well as in the consent experience
- description – we can here describe what application privileges role grants
- value – Azure AD will emit this value in the roles claim in the tokens that users and client applications get for the resource application
- allowedMemberTypes – this property dictates when the role can be assigned to the user and group or to a client application or both. To enable the role be assigned to users or groups, specify “User”, and to specify the role be assigned to client applications, specify “Application”.
- isEnabled – if the role is enabled or not
- origin – this property of role will be deprecated, set its value to “Application”
Here is how you can define your custom application roles:
1: "appRoles": [
2: {
3: "allowedMemberTypes": [
4: "User"
5: ],
6: "description": "Super Admin can perform all task.",
7: "displayName": "Super Admin",
8: "id": "23e16148-54a8-432a-c33c-ef680a3e49ef",
9: "isEnabled": true,
10: "origin": "Application",
11: "value": "SuperAdmin"
12: },
13: {
14: "allowedMemberTypes": [
15: "User"
16: ],
17: "description": "Worker can perfrom just limited set of actions",
18: "displayName": "Worker",
19: "id": "3f4e6bcc-7f38-4491-8acb-aeb74cc7ec3f",
20: "isEnabled": true,
21: "origin": "Application",
22: "value": "Worker"
23: },
24: ],
When you will upload your updated manifest file you will be able to assign users to custom roles. Navigate to the users tab under the application to which you would like to assign users and groups. Select a user and click on the Assign action on the bottom bar. Here you can assign the desired role to the user. Only the global administrator or the user administrator of the directory can assign application roles.
Configuring application
Here is how we can configure the application security options in MVC 6 Startup.cs file:
1: public void ConfigureApplication(IApplicationBuilder app, IHostingEnvironment env, ILoggerFactory loggerFactory)
2: {
3: ...
4:
5: app.UseIISPlatformHandler();
6: app.UseStaticFiles();
7:
8: app.UseCookieAuthentication(options =>
9: {
10: options.AutomaticAuthenticate = true;
11: });
12:
13: app.UseOpenIdConnectAuthentication(options =>
14: {
15: options.AutomaticChallenge = true;
16: options.ClientId = Configuration.Get<string>("Authentication:AzureAd:ClientId");
17: options.Authority = Configuration.Get<string>("Authentication:AzureAd:AADInstance") + "Common";
18: options.SignInScheme = CookieAuthenticationDefaults.AuthenticationScheme;
19:
20: options.TokenValidationParameters = new TokenValidationParameters
21: {
22: ValidateIssuer = false,
23: RoleClaimType = "roles"
24: };
25: options.Events = new OpenIdConnectEvents
26: {
27: OnAuthenticationValidated = (context) => Task.FromResult(0),
28: OnAuthenticationFailed = (context) =>
29: {
30: context.Response.Redirect("/Home/Error");
31: context.HandleResponse(); // Suppress the exception
32: return Task.FromResult(0);
33: },
34: OnRemoteError = (context) => Task.FromResult(0)
35: };
36: });
37:
38: app.UseMvc(routes =>
39: {
40: routes.MapRoute(name: "default", template: "{controller=Dashboard}/{action=Index}/{id?}");
41: });
42:
43: DatabaseInitializer.InitializaDatabaseAsync(app.ApplicationServices).Wait();
44: }
And example usage. Here is how we can authorize access to specific actions:
1: [Authorize(Roles = "SuperAdmin, Worker")]
2: public ActionResult Index()
3: {
4: ViewBag.Message = "Hello";
5: return View();
6: }
And use roles in code:
1: public ActionResult Submit(FormCollection formCollection)
2: {
3: if (User.IsInRole("SuperAdmin") || User.IsInRole("Worker"))
4: {
5: ...
6: }
7:
8: if (User.IsInRole("Admin"))
9: {
10: //do some admin tasks
11: }
12:
13: return RedirectToAction("Index", "Tasks");
14: }

 back
back

