Setting up a TFS 2015 on premise build system
By Mirek on (tags: msbuild, TFS 2015, categories: tools, infrastructure)In this post I will show you a step by step guide to install and set up the on premise Microsoft Team Foundation Server 2015 Update 2. At the end of this tutorial you will have a working source control and build system based on TFS 2015 so you will be able to check-in the project code to it and trigger a build.
We are installing a Team Foundation Server on a Windows Server 2012 R2. You can choose many installation options. Single server, where you have a tfs database and the server itself on the same machine. Dual server, where tfs database is located on a different machine. Multiple servers where you can deploy your application tier across multiple machines. In this guide we will use a single server configuration.
There are plenty of guides on installing the TFS server. The instructions on MSDN or Ban Day installation guide are sufficient to start in my opinion, so I will point you to these resources and skip the installation step in this post.
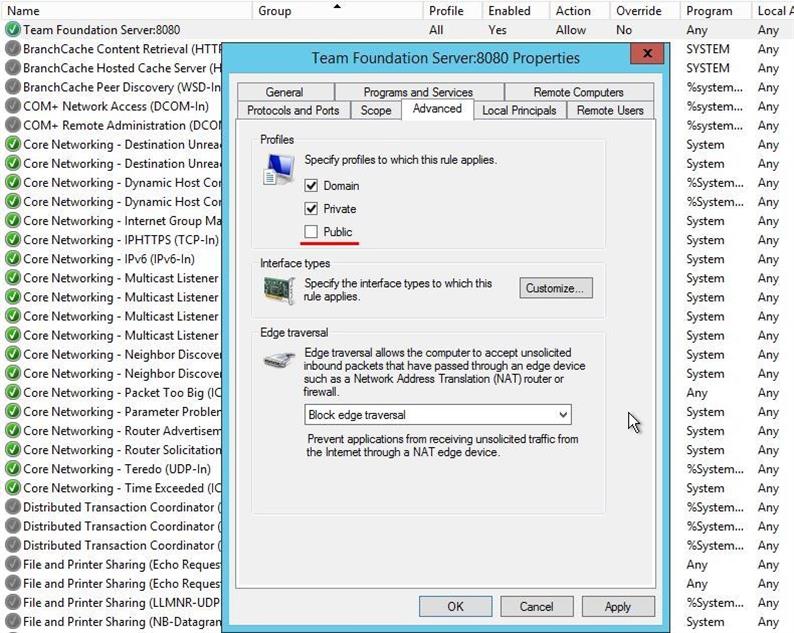
Once we have the TFS server installed on the remote machine we also need to configure the firewall rules so we can access it from local pc. By default the tfs installer add new incoming firewall rule on port 8080, which is the default port for accessing the TFS web portal. However you may find problems accessing the web portal from the local pc. Then first thing is opening the Team Foundation Server:8080 rule and checking the Advanced\Profiles section. It would looks like this
We need to include - check the Public profile and save the rule. This will apply the rule to the public network as well so we will be able to connect over the insecure internet connection.
Important note: For production environment use HTTPS protocol to access the web portal.
Once we are done with the installation and firewall configuration we should be able to access our Team Foundation Server via web browser on http://server2012:8080/tfs/. We will be asked for the credentials and we have to provide the user name and password for the account we created during the TFS setup.
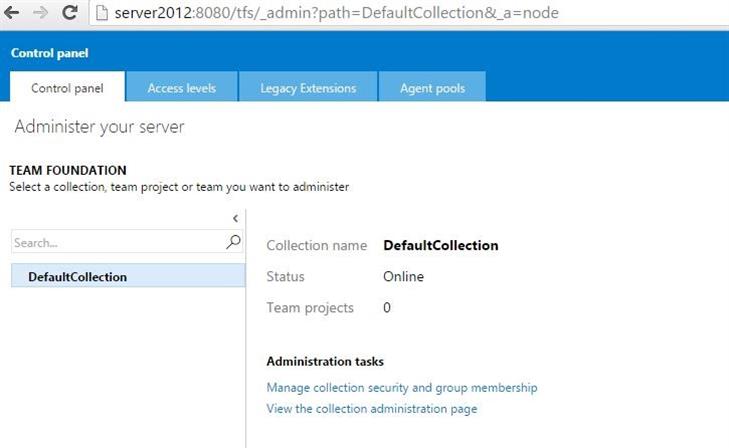
Next step is to configure the build agent. In Team Foundation Server 2015 we can have many build agents. Each of them can be running on a different machine. The build agent works on one team project collection and must be first deployed to the target building machine. More on that can be found on MSDN. If we run the TFS setup with the default settings then we already have a team project collection callled DefaultCollection and we also have the default agent on this collection ready to be configured and register. We can check that on http://server2012:8080/tfs/_admin/
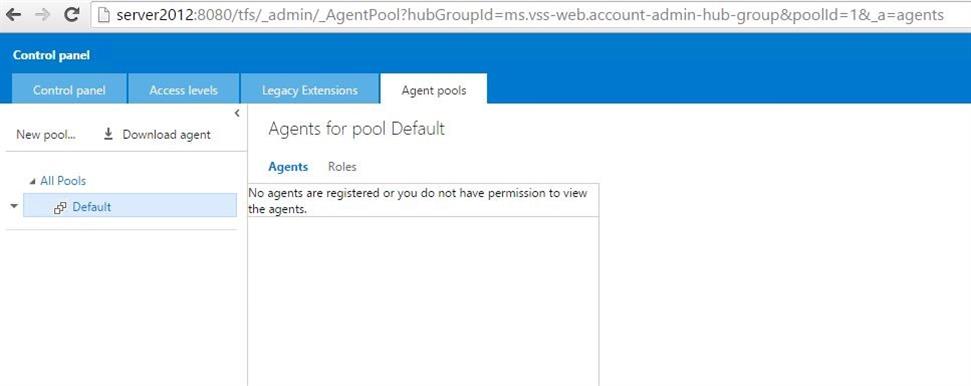
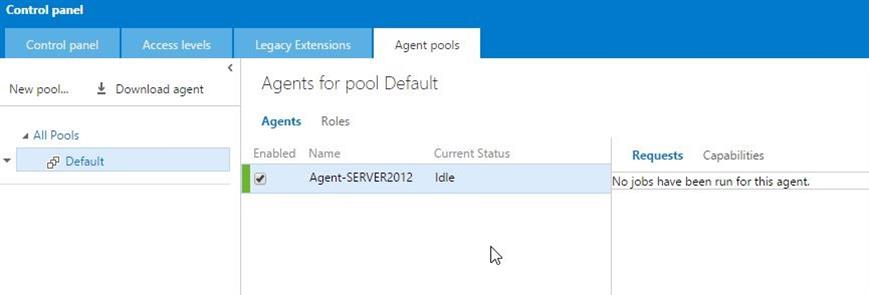
And in Agent pools tab
Here you can see that no build agents are registered yet. You will however have a default one here visible and running if you check the option during the TFS setup which says
Configure the build service to start automatically
I didn’t do it, so will have to configure the agent manually. You can configure and register new agent by clicking on Download agent. You will get the zip file, which you have to copy and extract on the target machine where you want the agent to be running. Then you have to run the ConfigureAgent.cmd script and follow the prompts to setup the build agent. In this guide I will however show you how to use the default agent which is created during the TFS installation. Note that having the build agent running on the same machine as TFS server is efficient only for small production team or for evaluation purposes. The configuration process of the agent is the same for default agent as for non default agents so you will have to go through this step anyway.
Go to the TFS server machine and navigate to
C:\Program Files\Microsoft Team Foundation Server 14.0\Build
and run the ConfigureAgent.cmd script as a administrator.
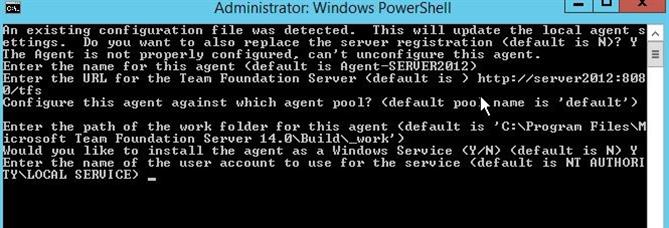
(You will not see the question for the replacing agent and server registration for the first time. I get it since I have been repeating the agent configuration more than once).
The settings here are
- Set agent name – default is ok
- Enter the url to the TFS server ex. http://server2012:8080/tfs
- Configure the agent against 'default' agent pool. Agent pools gives more granularity of permissions in large teams.
- Set work folder for the agent. This is the folder where recent sources will be downloaded and build output will be stored. Default is ok.
- Install agent as a windows service. The other option is to start agent in a console.
Once we have the agent configured we can check if its running as a service
and we should also immediately see it in the TFS web portal
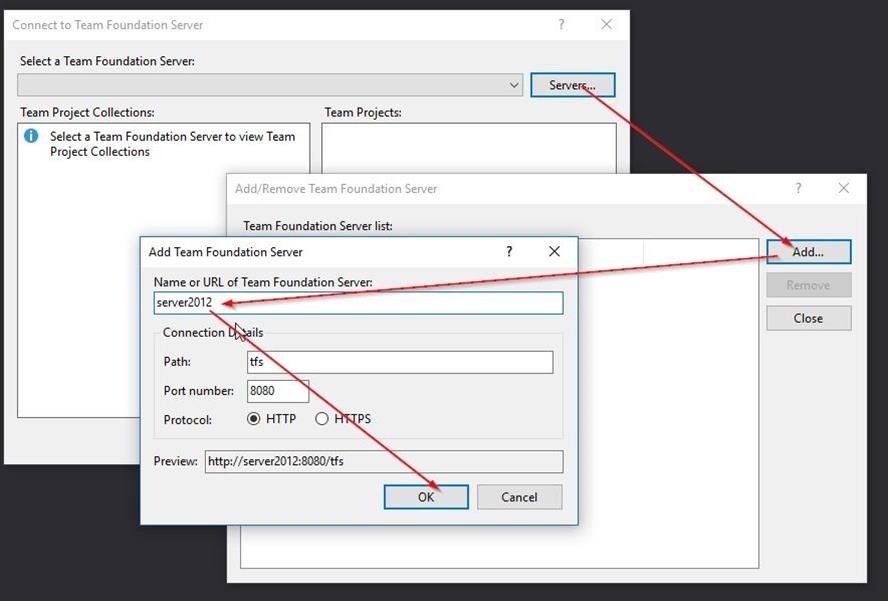
Now it is time to create the team project. To do that we have to connect to TFS with Visual Studio. So start Visual Studio 2015 and add a Team Server Connection
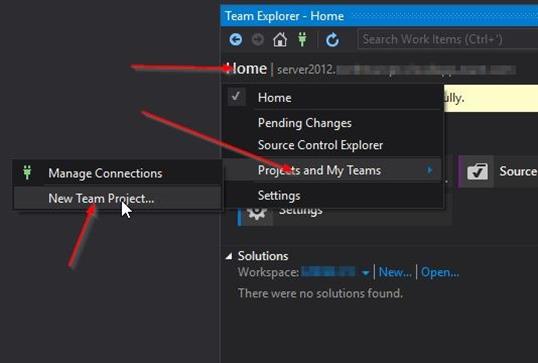
Connect to the DefaultCollection then configure and map your local workspace in TeamExplorer. Create new team project
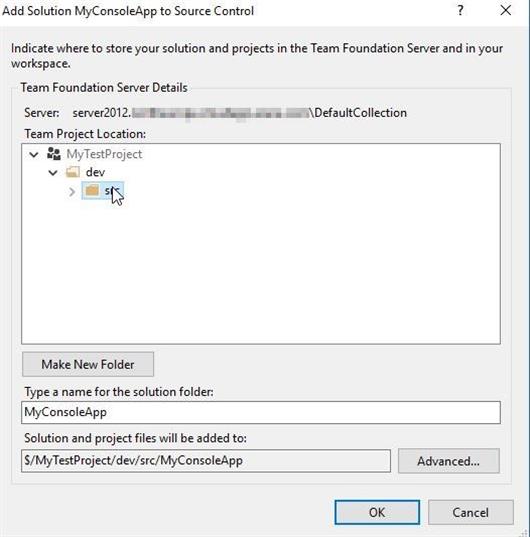
Set its name, process template and the source control to be Team Foundation Version Control or Git. Create new console project and add it to the source control. Save the code under two level subfolder like this
Save the project and commit changes to the repository.
Now you should be able to navigate to the team project dashboard http://server2012:8080/tfs/DefaultCollection/MyTestProject/_dashboards. You can find the documentation about the TFS web portal on MSDN. In this post we only want to create and queue a simpe build definition, so click the Build section navigation link.
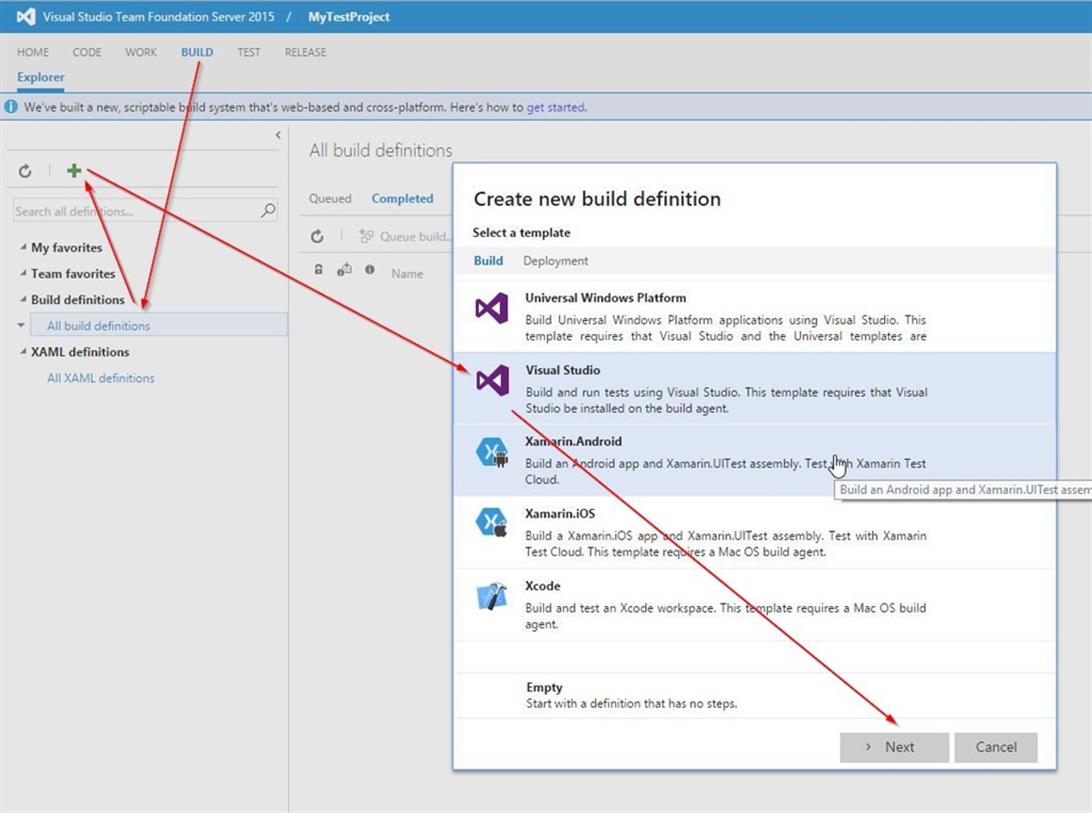
Here you can create and manage your build definitions. You can create old type XAML based build definitions. This is useful if you already have a complex build definitions in previous version of Team Foundation Server and you want to port them into new TFS. There is however new recommended build engine called Build vNext in TFS 2015 and we will use this. So create new Visual Studio Build definition as shown below
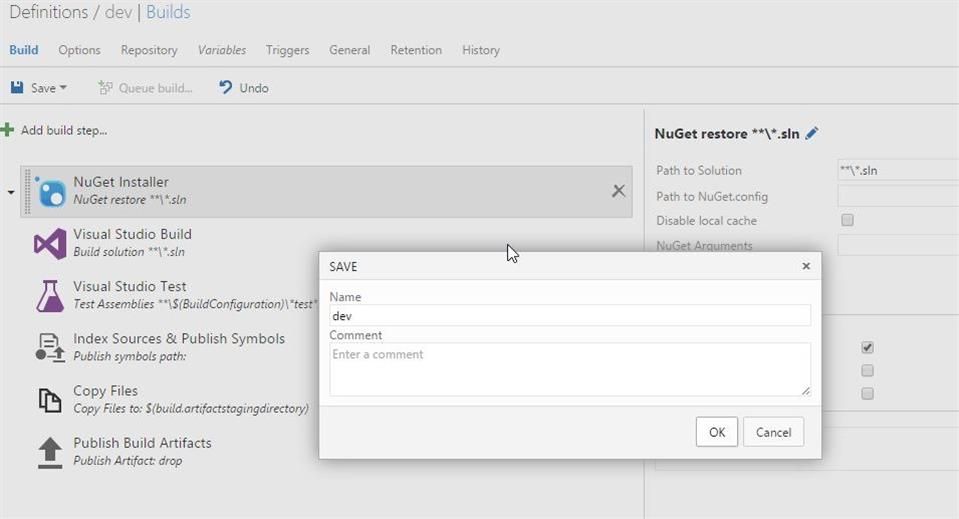
On the next slide select the source project repository and check the Continuous integration (build whenever this repository is updated) so it will build the sources on every commit. More resources in this topic here. Click next and save the build definition with all its default.
You can now queue the build and check if it works. It will however fail to build with an error similar to this one
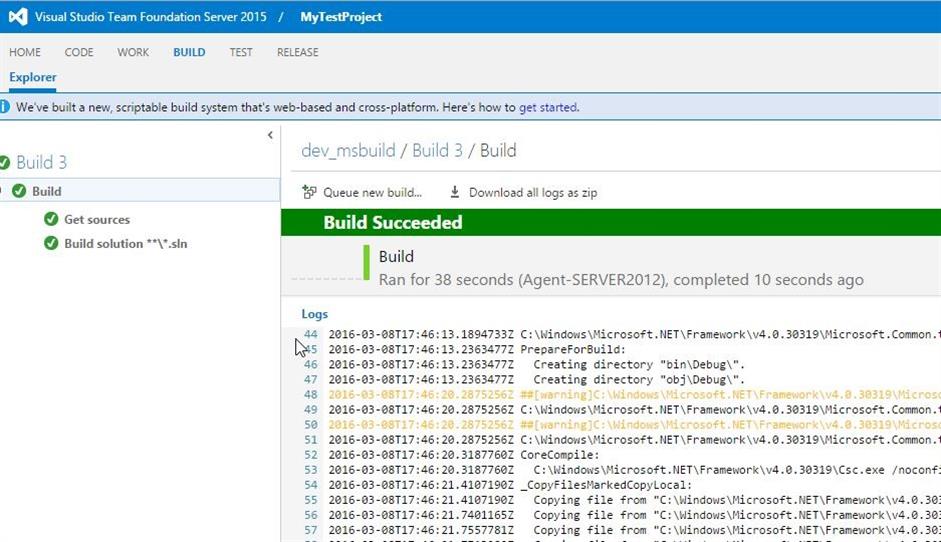
This is caused by lack of Visual Studio compiler on the agent machine. This is true since we didn’t install the Visual Studio there and we don’t want to install it on the build machine. So the only solution is to use the msbuild compiler instead. Create new build definition from empty template and add new build step to it (section build –> MSBuild). Queue the build and you will see that now it will succeed. The build agent took the msbuild version installed with the .Net framework and used it to build the solution.
Instead of installing the full Visual Studio on the build agent machine we will install the Microsoft Build Tools 2015 which will provide the latest version of MSBuild and compiler tools. You might however still get some problems. For instance when building a web application project you may get the error like
Error MSB4019: The imported project "C:\Program Files (x86)\MSBuild\Microsoft\VisualStudio\v14.0\WebApplications\Microsoft.WebApplication.targets" was not found. Confirm that the path in the<Import> declaration is correct, and that the file exists on disk.
To fix that simply copy the missing folder from where you have the Visual Studio 2015 installed.
That’s it for this time. In next posts you will see how to configure the build definition template and how to create custom build steps.

 back
back
