Creating custom vNext build task for Team Foundation Server 2015
By Mirek on (tags: build, tfs, vNext, categories: tools, infrastructure)The new vNext build system in TFS 2015 is simpler and easier to manage than the previous version, Windows Workflow based, build system. It builds up from a collection of build step which you can add and remove. The collection of available build steps is pretty rich and can be extended by a custom build steps. In this post I will show you how to easy create and deploy a custom vNext build step.
UPDATE 08.05.2017: This solution is not valid on TFS 2017 Update 1 any more. Go here for working approach.
Build step in Visual Studio Online or TFS 2015 is basically a nodejs or powershell script which is run by the build agent. It may accept the input parameters and has access to the build variables and build directories.
There is a github repository where you can find most of the build steps used in VSO and TFS 2015. This is a good place to give you a reference on how to construct your own build steps. Apart from the logic contained in the actual step script, the build step also requires a definition file in json format. I couldn’t find a good documentation on the structure of this file at the moment of writing this post, but we can take and see the structure of it from the mentioned build steps repository.
Apart from the only mandatory files, wchih we need to create and upload to the tfs server, there are also optional files like build step icon (32x32 pixels .png or .svg image) and the multilingual translations. You will see many examples of it in the steps repo too.
Let’s then create a custom build step, which will just, for testing purposes and for the simplicity, lists us few build agent directories. Lets name it ShowDirs. We start with ShowDirs.ps1 file and fill it with these few commands
1: [cmdletbinding()]
2: param(
3: )
4:
5: Write-Host "env:AGENT_HOMEDIRECTORY= $env:AGENT_HOMEDIRECTORY"
6: Write-Host "env:AGENT_BUILDDIRECTORY= $env:AGENT_BUILDDIRECTORY"
7: Write-Host "env:BUILD_SOURCESDIRECTORY= $env:BUILD_SOURCESDIRECTORY"
8: Write-Host "env:BUILD_STAGINGDIRECTORY= $env:BUILD_STAGINGDIRECTORY"
9: Write-Host "Current working directory= $(Get-Location)"
By the way all build variables are available as a environmental variables in step scripts. You access them as shown above, by $env:. More on build variables can be found here.
Next we need to define the task.json file
1: {
2: "id": "A02B0391-4A2E-46DE-A31D-18D49FA11BFB",
3: "name": "ShowDirs",
4: "friendlyName": "Show dirs",
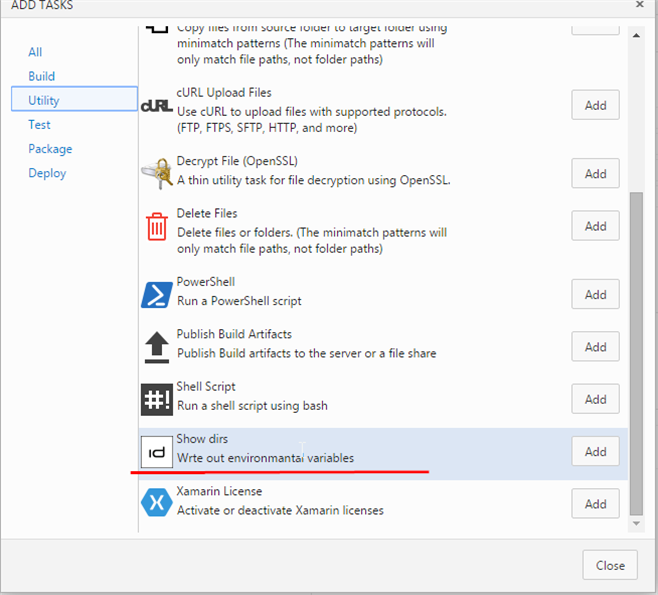
5: "description": "Wrte out environmantal variables",
6: "helpMarkDown": "",
7: "category": "Utility",
8: "author": "Mirek",
9: "version": {
10: "Major": 1,
11: "Minor": 0,
12: "Patch": 0
13: },
14: "minimumAgentVersion": "1.83.0",
15:
16: "execution": {
17: "PowerShell": {
18: "target": "$(currentDirectory)\\ShowDirs.ps1",
19: "argumentFormat": "",
20: "workingDirectory": ""
21: }
22: }
23: }
Most important: the id parameter must be an unique guid, which you should generate your self for each of custom build step you upload. The category string must match one of the existing categories visible in TFS web portal. This file lacks the input parameters, since our task step does not require any. However again, you can find many examples of input parameters in the mentioned tasks repo on the github.
Now we are ready to upload the build step to the TFS server. All we need to do is to place the files in a folder, zip it and upload to the rest API available at
where {id} is the id of the task. Here is the powershell script which will simplify this process
function Upload-BuildStep
{
[CmdletBinding()]
param(
[Parameter(Mandatory=$true)][string]$TaskPath,
[Parameter(Mandatory=$true)][string]$TfsUrl,
[PSCredential]$Credential = (Get-Credential),
[switch]$Overwrite = $false
)
# Load task definition from the JSON file
$taskDefinition = (Get-Content $taskPath\task.json) -join "`n" | ConvertFrom-Json
$taskFolder = Get-Item $TaskPath
# Zip the task content
Write-Output "Zipping task content"
$taskZip = ("{0}\..\{1}.zip" -f $taskFolder, $taskDefinition.id)
if (Test-Path $taskZip) { Remove-Item $taskZip }
Add-Type -AssemblyName "System.IO.Compression.FileSystem"
[IO.Compression.ZipFile]::CreateFromDirectory($taskFolder, $taskZip)
# Prepare to upload the task
Write-Output "Uploading task content"
$headers = @{ "Accept" = "application/json; api-version=2.0-preview"; "X-TFS-FedAuthRedirect" = "Suppress" }
$taskZipItem = Get-Item $taskZip
$headers.Add("Content-Range", "bytes 0-$($taskZipItem.Length - 1)/$($taskZipItem.Length)")
$url = ("{0}/_apis/distributedtask/tasks/{1}" -f $TfsUrl, $taskDefinition.id)
if ($Overwrite) {
$url += "?overwrite=true"
}
Write-Output "Uploading task to: $url"
# Actually upload it
Invoke-RestMethod -Uri $url -Credential $Credential -Headers $headers -ContentType application/octet-stream -Method Put -InFile $taskZipItem
}
To upload a custom task located in ShowDirs directory just run following command
Upload-BuildStep -TaskPath .\ShowDirs -TfsUrl http://server2012:8080/tfs -Credential admin
You will be prompted for the account password and if everything went ok you should see the build step on the build steps collection available in the web portal.
And finally when you add it to your build definition you will get the directories paths in the output console and in the logs
Important note: every time you want to update the custom build step to the next version, you will have to increase the version of the step in task.json file. Otherwise the build server will not accept it.
"version": {
"Major": 1,
"Minor": 0,
"Patch": 1
},

 back
back


Jahir
4/27/2017 10:57 AM
I tried same thing in TFS 2017 Update 1 and it is throwing 404 error code. But I am able to download tasks.jon while browsing http://<%hostname%>:8080/tfs/_apis/distributedtask/tasks. It would be grate if someone can help me to address this.Rabiul
9/29/2017 5:30 PM
I want to delete the task I have added. Please let me know how I can delete. Thanks