Your first Azure Active Directory tenant
By Dawid on (tags: active, azure, directory, categories: azure)In this short blog I will demonstrate how to create your first Azure AD tenant. Next blog post will describe how to use this tenant with your application.
The definition on Microsoft page says that Azure Azure Active directory is:
Azure Active Directory (Azure AD) is Microsoft’s multi-tenant, cloud based directory and identity management service. Azure AD combines core directory services, advanced identity governance, and application access management. Azure AD also offers a rich, standards-based platform that enables developers to deliver access control to their applications, based on centralized policy and rules.
You can compare tenant to and organization - it’s representation of an organization within Azure Active Directory. Each tenant is separated from other Azure AD tenants. When the tenant will be ready you can define an application, assign users, roles and permissions. There is lot of terms but what is the relationship between Azure account, subscription, directory and user resource groups.
Relationship
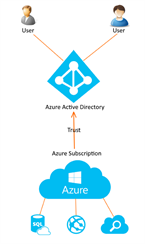
There is quite a lot of articles but in fact that is quite simple. The Azure account is a global unique entity that gets you access to all Azure services (as you probably already saw there is quite a lot of them) and your Azure subscription. You can create multiple subscriptions in your Azure account. This is quite useful when you would like to have e.g. better billing management. You can create and manage resources (e.g. group in resource groups) within each of the subscriptions. Azure subscription can have a trust relationship with an Azure Active Directory instance. The last sentence is quite important to understand! You also need to known that each subscription can trust only one directory but you can have multiple subscriptions which will use (trust) the same Azure Active Directory.
Creation process
The process of creating directory is quite simple and looks like this:
- Navigate to Azure portal and sign in with account that has an Azure subscription
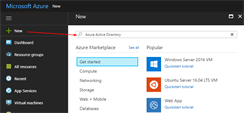
- Use search to find Azure Active Directory

- When Azure Active Directory will be found simply click Create button
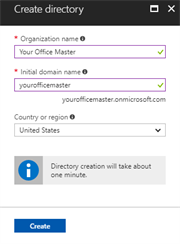
- Type name for the organization, initial domain name select country and that’s all. As you probably noticed your initial domain will be a part of onmicrosoft.com. Of course you can change it later on and assign multiple domains to your directory.

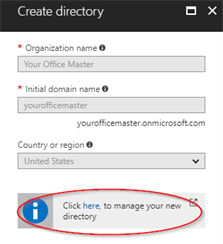
- Once the directory is ready you can click the information box to manage your new directory.


 back
back

Mirosław Miedziarek
12/18/2023 5:46 PM
Fantastic post Dawid!